Journey Builder Basics
Journey Builder is a powerful automation tool in SFMC that allows you to create personalized, multi-step customer journeys across various channels, such as email, SMS, push notifications, and ads. It helps marketers design and automate customer engagement workflows based on real-time interactions and data.

- Drag-and-Drop Interface – Easily design customer journeys without coding.
- Multi-Channel Engagement – Send emails, SMS, push notifications, and more.
- Entry Sources – Start journeys based on triggers like form submissions, data updates, or API events.
- Decision Splits & Personalization – Segment customers based on behavior, demographics, or preferences.
- Real-Time Data Updates – Integrates with Data Extensions, CRM, and external APIs.
- Goal Tracking & Analytics – Measure conversions and optimize performance.
- Journey Testing & Validation – Run test journeys before launching live campaigns.

Step 1: Access Journey Builder
- Log in to Salesforce Marketing Cloud.
- Navigate to Journey Builder from the main menu.
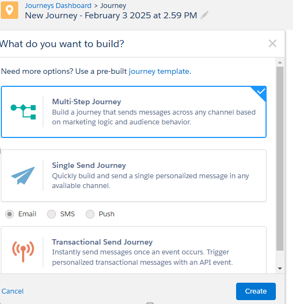
- Click Create New Journey → Choose between:
- Multi-Step Journey – For advanced, multi-channel workflows.
- Single Send Journey – For one-time email or SMS sends.
- Transactional Journey – For real-time triggered messages.
Step 2: Configure Entry Source (Audience)
- Click “Select Entry Source” to define how customers enter the journey.
- Choose an entry source:
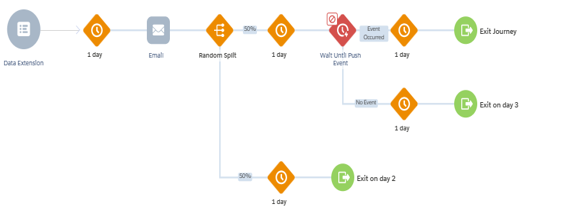
- Data Extension – Uses a pre-defined list of contacts.
- API Event – Triggers journeys from external applications.
- Cloud Pages – Starts when a user submits a form.
- Salesforce Data – Syncs with CRM data (e.g., Lead updates).

Step 3: Design the Journey Flow
- Drag Email, SMS, Push Notification, or Advertising activities to define customer interactions.
- Use Decision Splits to segment users based on behaviors (e.g., opened email, clicked link, ignored message).
- Add Wait Steps to introduce delays between interactions
- Include Update Contact Data actions to modify customer attributes dynamically.

Step 4: Configure Email & SMS Messages
- Select an Email Activity and choose a pre-built email from Content Builder.
- Enable Personalization using AMPscript or Dynamic Content.
- Add an SMS Activity if you want to send text messages via MobileConnect.
Step 5: Set Goals & Exit Criteria
- Define a goal (e.g., “User completes purchase”).
- Set exit criteria to remove contacts who meet specific conditions.
Step 6: Test & Validate
- Use Journey Builder’s Test Mode to simulate user flows.
- Send test emails to preview content rendering.
- Check journey validation to ensure smooth execution.
Step 7: Activate & Monitor Performance
- Click “Activate Journey” to launch.
- Monitor progress using Journey Analytics, Engagement Metrics, and Conversion Tracking.
- Optimize based on real-time data.


